What is a VR panorama anyway - Tutorial zero
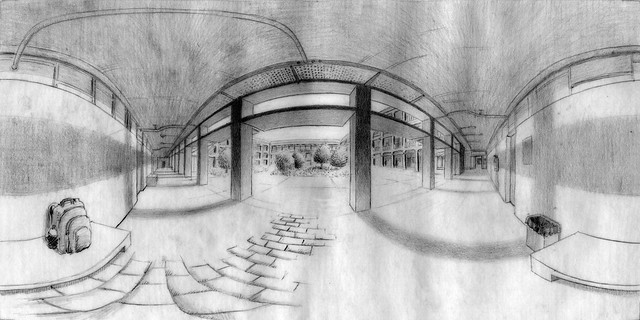
What is a spherical perspective anyway, and how does it relate to a VR panorama? Figure 1 below is an example of a spherical perspective:
I did it from an observation sketch ("urban sketching") on an A4 sheet of tracing paper, at the ISEL engineering school in Lisbon, Portugal (careful shading was later finished at home).
You see the drawing is somehow "deformed". You can sort of guess that all these curved lines represent straight lines in space, and that the scene represents a corridor going from left to right. You can see things that are to your left, right, front, back, above and below. In fact, what you get in exchange for the deformation of the lines is that you can fit in this drawing the complete visual information of the scene, as seen by an observer that is in a fixed point in space, but can rotate his gaze freely.
The proof that this is so, is that a computer can read this drawing and recover the original, immersive visual experience for you - the experience of being there and being able to look around. That immersive, interactive experience is called a VR panorama.
If you click on the picture below and drag the mouse around you will experience the sensation of being inside the environment from which the drawing above was made. The VR panorama is fully rendered from the information in the spherical perspective drawing above.
Here is a very quick summary of what's happening and how you can do it yourself. It is very superficial but it sums up what most people are doing in order to create these drawings. Later I will explain it better.
Basically, you can imagine that someone projected a 3D scene radially onto a sphere. This creates a drawing on the sphere - a "spherical anamorphosis" - that would create the illusion of the original 3D scene, if you looked at it from the center of the sphere.
That is what VR panoramas do - they use your screen to simulate the view from inside the sphere. So you can look around and look at the immersive anamorphosis and have the illusion of looking at an actual 3D scene.
In order to draw these panoramas we could just paint directly on the sphere, but that is difficult. We like to draw on planes. So what we need is a way to make every point on the sphere correspond to a point on the plane. Once we established that correspondence, we can draw on the plane and then transport the drawing back to the sphere.
Of course, such a correspondence between the sphere and the plane is just cartography! And indeed for every choice of cartographic map you have a different spherical perspective. Spherical perspective is just that two step process: a spherical anamorphosis followed by a flattening to the plane, the flattening being done by a choice of map.
In the picture below we see the result of applying two different maps to the same spherical anamorphosis of a cubic room, seen from its center. The visual information is exactly the same, and so will the VR panorama look the same (in principle). The one on the left is the result of using the equirectangular map (and hence it is called an equirectangular spherical perspective) and the one on the right is the result of using the azimuthal equidistant map, and hence it is called azimuthal equidistant spherical perspective. The perspectives take the names of their maps, as that is the only difference between them. As you see, both images are deformed in some way, but they still carry all the visual information of the scene - the proof is that both of them can be used to make the same VR panorama, that is, to recreate the visual sensation of the original scene.
For technical reasons, equirectangular spherical perspective is the preferred one for the software that creates VR panoramas. So we will focus on that one first, although the second is in some ways the more natural of the two.
Now, in order to turn that spherical drawing into a drawing on a sheet of paper, you have to flatten the sphere. You can do that in many ways - it is like creating a world map from a globe.
One way is just to chart longitudes and latitudes orthogonally onto a rectangle.
We set an orthogonal right-handed referential on the sphere with points F(front), L(eft), U(p), and their antipodes B(ack), R(ight), D(own) (see figure below). We release the Up-Down meridians at their extremities (keeping them fixed at the equator) and straighten them without stretching, to form a cylinder. Then cutting the cylinder we get a 2x1 rectangle.
The Up-Down meridians and the parallels are transformed into vertical and horizontal lines respectively. The rectangle's proportions are exactly 2x1, measuring longitudes from -180º to +180º and latitudes from -90º to +90º. Because we haven't stretched the U-D meridians or the equator, angular measurements are invariant on these lines. On all others lines the measurements have changed, however.
Now, what happens to the images of spatial lines? Remember, these are first projected onto the sphere and then flattened. It is easy to see that vertical spatial lines get projected onto U-D meridians and from then to verticals again in the flat drawing. What about horizontals? For reasons we will investigate later, they get projected like in the picture below, that illustrates horizontals that go from left to right and pass in front of the observer above the horizon (Fig. 6).
Later we will see how we get the shape of these lines. For now we note that if we repeat this picture, centered on the other reference points (L, R, B), then reflect across the horizontal to get the lines passing under the horizon, and finally add the verticals we get a grid like this:
Now this grid is all that most people use in order to draw in equirectangular perspective. Let's us imagine you wanted to draw a rectangle. Then you just draw on top of the grid from A to B along a horizontal, then lower verticals to a horizontal further down and close it up with another horizontal segment CD. You can proceed with the same technique to draw a full room.
Once you've done that drawing you can see the room as a VR panorama by uploading it to an adequate platform. Below you can see it on Flickr:
So, how do you upload the picture to see it in VR? First, you must save it in exactly 2-by-1 format (for instance 2000 by 1000 pixels). Then, on flickr, you just upload the picture and add the tag "equirectangular". This is all it takes for flickr to interpret it as a VR panorama.
On facebook you need a further step. You must add EXIF metadata that convices facebook that the picture comes from a 360-degrees photographic camera. You can do this easily at the 360Toolkit website. Try it.
So there you are. This is enough to make your first panorama and start experimenting by trial-and-error. Of course, you still don't really know what is going on. You know how to make horizontals and verticals, but what about diagonals? And how do you measure lenghts? We'll leave that for a next time.
 |
| Fig 1. Spherical perspective drawing. Graphite on A4 tracing paper. |
You see the drawing is somehow "deformed". You can sort of guess that all these curved lines represent straight lines in space, and that the scene represents a corridor going from left to right. You can see things that are to your left, right, front, back, above and below. In fact, what you get in exchange for the deformation of the lines is that you can fit in this drawing the complete visual information of the scene, as seen by an observer that is in a fixed point in space, but can rotate his gaze freely.
The proof that this is so, is that a computer can read this drawing and recover the original, immersive visual experience for you - the experience of being there and being able to look around. That immersive, interactive experience is called a VR panorama.
If you click on the picture below and drag the mouse around you will experience the sensation of being inside the environment from which the drawing above was made. The VR panorama is fully rendered from the information in the spherical perspective drawing above.
 |
| Fig 2. VR panorama of the scene in Fig.1. Drag with the mouse to see it in VR. |
Here is a very quick summary of what's happening and how you can do it yourself. It is very superficial but it sums up what most people are doing in order to create these drawings. Later I will explain it better.
Basically, you can imagine that someone projected a 3D scene radially onto a sphere. This creates a drawing on the sphere - a "spherical anamorphosis" - that would create the illusion of the original 3D scene, if you looked at it from the center of the sphere.
 |
| Fig. 3 A pyramid projected radially onto a sphere's surface. From the center of the sphere the projection (in blue) looks exactly like the real 3D object (under certain experimental conditions). This is a spherical anamorphosis. |
In order to draw these panoramas we could just paint directly on the sphere, but that is difficult. We like to draw on planes. So what we need is a way to make every point on the sphere correspond to a point on the plane. Once we established that correspondence, we can draw on the plane and then transport the drawing back to the sphere.
Of course, such a correspondence between the sphere and the plane is just cartography! And indeed for every choice of cartographic map you have a different spherical perspective. Spherical perspective is just that two step process: a spherical anamorphosis followed by a flattening to the plane, the flattening being done by a choice of map.
In the picture below we see the result of applying two different maps to the same spherical anamorphosis of a cubic room, seen from its center. The visual information is exactly the same, and so will the VR panorama look the same (in principle). The one on the left is the result of using the equirectangular map (and hence it is called an equirectangular spherical perspective) and the one on the right is the result of using the azimuthal equidistant map, and hence it is called azimuthal equidistant spherical perspective. The perspectives take the names of their maps, as that is the only difference between them. As you see, both images are deformed in some way, but they still carry all the visual information of the scene - the proof is that both of them can be used to make the same VR panorama, that is, to recreate the visual sensation of the original scene.
 |
| Fig 4. Two spherical perspectives of the same 3D scene. Left: equirectangular perspective. Right: Azimuthal equidistant (or "360-fisheye") perspective. |
For technical reasons, equirectangular spherical perspective is the preferred one for the software that creates VR panoramas. So we will focus on that one first, although the second is in some ways the more natural of the two.
Now, in order to turn that spherical drawing into a drawing on a sheet of paper, you have to flatten the sphere. You can do that in many ways - it is like creating a world map from a globe.
One way is just to chart longitudes and latitudes orthogonally onto a rectangle.
We set an orthogonal right-handed referential on the sphere with points F(front), L(eft), U(p), and their antipodes B(ack), R(ight), D(own) (see figure below). We release the Up-Down meridians at their extremities (keeping them fixed at the equator) and straighten them without stretching, to form a cylinder. Then cutting the cylinder we get a 2x1 rectangle.
 |
| Fig 5. Equirectangular flattening: Loosen the Up-Down meridians and straighten them to change the sphere into a cylinder. Then cut and open the cylinder to get a rectangle. |
The Up-Down meridians and the parallels are transformed into vertical and horizontal lines respectively. The rectangle's proportions are exactly 2x1, measuring longitudes from -180º to +180º and latitudes from -90º to +90º. Because we haven't stretched the U-D meridians or the equator, angular measurements are invariant on these lines. On all others lines the measurements have changed, however.
Now, what happens to the images of spatial lines? Remember, these are first projected onto the sphere and then flattened. It is easy to see that vertical spatial lines get projected onto U-D meridians and from then to verticals again in the flat drawing. What about horizontals? For reasons we will investigate later, they get projected like in the picture below, that illustrates horizontals that go from left to right and pass in front of the observer above the horizon (Fig. 6).
These lines are quite curious: the ones that pass low in front of you, near the horizon, look like sinusoids; then as they go higher they get progressively squarish; and the one that passes right above your head, at 90 degrees to the horizon, is a complete half-square.
 |
| Fig 6. Left: Projection on the sphere of spatial lines going from left to right. Right: Flattening of these lines in the equirectangular perspective. |
Later we will see how we get the shape of these lines. For now we note that if we repeat this picture, centered on the other reference points (L, R, B), then reflect across the horizontal to get the lines passing under the horizon, and finally add the verticals we get a grid like this:
 |
| Fig. 7. Grid of equirectangular verticals and horizontals at 5º intervals. |
 |
| Fig 8. A basic room drawing in equirectangular perspective. |
 |
| Fig 9. VR panorama of the drawing of Fig. 8. Drag with the mouse to see it in VR. |
So, how do you upload the picture to see it in VR? First, you must save it in exactly 2-by-1 format (for instance 2000 by 1000 pixels). Then, on flickr, you just upload the picture and add the tag "equirectangular". This is all it takes for flickr to interpret it as a VR panorama.
On facebook you need a further step. You must add EXIF metadata that convices facebook that the picture comes from a 360-degrees photographic camera. You can do this easily at the 360Toolkit website. Try it.
So there you are. This is enough to make your first panorama and start experimenting by trial-and-error. Of course, you still don't really know what is going on. You know how to make horizontals and verticals, but what about diagonals? And how do you measure lenghts? We'll leave that for a next time.

Comments
Post a Comment